Showing posts with label off camera flash. Show all posts

Flash Workshop with Stephanie - Ridley Creek State Park, Aston, Media Photographer

A couple of weeks ago the Philly SmugMug group held a flash workshop in Ridley Creek State Park.  I had the privilege of leading one of the groups!

Here's a few behind the scenes pics of us working with our model, Stephanie.


After the workshop, I did a mini-session with Stephanie and a few photographers tagged along to see me work with the natural light.  Here's a few pics from that!  Thanks again to Stephanie for helping us out at the workshop!


Alice: Portraits

A couple of weeks ago I had the pleasure of taking some portraits of Alice with my photog friend, Dan of Daniel Fugaciu Photography in the Penns Landing area of Philly!  It was a lot of fun - thank you Alice for being our patient model.  We got to play with off camera flash as well as natural light.

Here's some of my faves :)


Matt: 2010 and 2012

Last week I had my second session with Matt.  My first session was in 2010 when I first started out.  I figured it'd be fun to look back at that session and see what has changed in my style of photography since then.  Let's just say: Lots and lots of GROWTH.

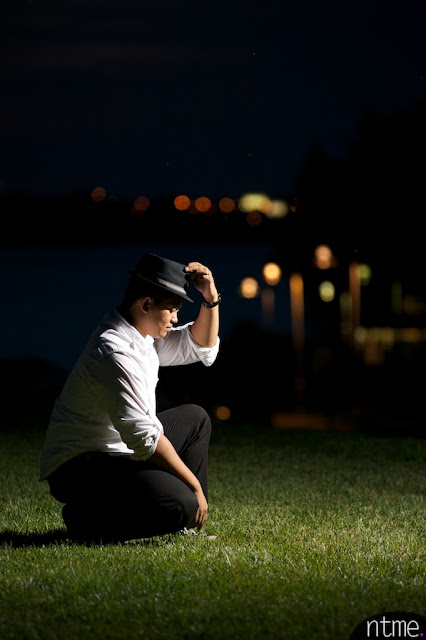
One thing I can tell you is.. lighting.  I was JUST starting to try off camera flash back then and this time around, we had a ton of fun using it to creatively light Matt, both during the day and also at night.

I had a lot of fun, and I thank Matt for choosing me for his headshot images.  Obviously, we had a little more fun than just headshots.  Our night session was at the Race Street Pier in Philly, where you can see the Ben Franklin Bridge.

Matt - I wish you the best in your acting career! :)


So let's do a little comparison of a few images from THEN and NOW.

I've seen significant improvement on my 'epic pics' LOL, but still a lot to learn!

2010:
2012:


As well as my composition and use of natural lighting.

2010:

2012:


Would you believe this was taken with Matt sitting down on the pavement of a parking lot?  The background is just the grey payment thrown out of focus lol.   I will try to remember to take an image of my setup in the future, but it was about to rain so I was scurrying hehe! 

Basically, one light off to camera right, with umbrella, and one flash close to the ground behind him camera left with grid to give his hair separation from the parking lot.

So yeah, here's to the future and ever continuous learning!
Okay, enjoy!! :)


Date Night? Photography Practice? Or both?!

So, Tuesdays are date nights for Fred and me, and lately our Tuesdays have been full.. but tonight we had some time to get dolled up and go out for our date night!

So what did we do?  We took pictures of each other HAHAHAHAHA!  It was nice to just go out and shoot for fun.. and try new things in our photography.  So much to learn and try, and Fred and I are just always striving to improve our skills.  Here's a few pics of us on our date night.

Good thing we brought the bug spray HAHAHA!


This first photo is my favorite of myself from the night - thank you Fred!  I just like how I'm in a spot light.. the flash is directly in front of me (the direction my head is facing).. and it's up pretty high and aimed down at me... giving this spotlight effect.


 This is one of my faves of Fred.. it's the same thing as above.. but now it's Fred HAHAHA!


I wanted to do a silhouette, so I exposed for the sky and didn't add flash..


Fred went for an unconventional crop, I like!

The street lamp was lighting the tree and I liked the gradient it made.. and I added flash on Fred.

This was a fluke.. the flash was right beside Fred and wasn't even set correctly (way too much power), but I decided to see if it would work.. and I guess b/c the flash was not facing Fred directly.. the spill is the part that hit him and wasn't overpowering.. so it ended up being just enough for him.  See how it falls off sharply though at his waist?  Yeah.. cuz the flash was not pointed at him, but somehow it worked out!


And there you have it, our date night! Yay!

How I Do: Using Flash Indoors (Chapel)

So... a couple of weeks ago I talked about giving your outdoor images more 'umph' by using flash.  This time let me talk about using flash inside of a chapel.  This isn't always going to be the case, but at least I can give you an idea of how I do it and the difference it can make.

Below is an image made with available light inside a chapel that has both flourescent and tungsten lighting.  It's decent, but it's hard to find WB in such a setting with multiple types of light lol.  I believe I went more with tungsten WB in camera and then played with it a bit more in post.

Decent image, but not a wow image right? Still, a good starting point and a solid image to deliver to a client :)


But look at what happens when you add flash in this situation.  It almost puts a spotlight on them.  I definitely prefer this to the first image.

So how was it done?  Same formula as for outside.  For the record, I don't use gels.  Maybe one day, but I like the warmth that the tungsten gives off when I set my camera to Flash White Balance.

1) Expose for the background. 
If you want it to be darker, speed up the shutter speed, just remember to account for your flash sync speed.  I was at f/4, with a shutter of 1/250, ISO 2000.

For the whole ceremony, I was at ISO 2000 b/c I wanted my shutter speed to be high enough to avoid camera shake using the available light.  So I just kept the same settings here for ease. I could have also lowered the ISO for these portraits, which would consequently slow down the shutter speed and have gotten the same result.  I would just have needed more flash power, which is not a problem with my trusty Quantum T5D-R or whatever it's called.

Do you see the relationship here between ISO, shutter speed, and flash power?  

Higher ISO = Faster Shutter speed (since camera becomes more sensitive to light) = Less Flash Power Needed.

Lower ISO = Slower Shutter Speed (camera less sensitive to the light, so gotta keep shutter open longer) = MORE Flash Power needed in that same situation.

Aperture is kind of arbitrary.. at least to me (omgosh, don't take my word as truth okay?).  It's at f/4 in this case b/c.. that's the aperture that accompanied my 1/250 shutter to get my background to be the way I wanted it to be...  I usually start at 1/250 and then adjust my aperture accordingly.  But honestly, it depends on the situation you are in.. how bright or dim the ambient light is... it's just something you get with time.  Sometimes I'm at 1/60th at like ISO 800.  It just really depends.  And I'm STILL figuring it out LOL.

Am I confusing?  If so, I apologize in advance, AND I suggest you no longer read my 'How To's" LOL.

2)  Light your subject!
Assuming you darken the environment a bit for more dramatics, your subjects will also be dark.  So.. now that it's time to add flash, I do it manually since I'm using off camera flash.  I don't care for TTL at this juncture, I just eyeball it.. and feel it's the easiest way to learn anyway.  I start at around 1/8 power on my flash and.. if it's too bright.. I'll lower it.. if it's too dark still, I'll raise it.  Simple as that!


Hope that helps ... someone out there.. somewhere! :)

How I Do: Using Flash to Give Your Image More "Umph"

So I'm going to blog really quickly since I would like to blog more regularly (I keep saying that, don't I?).  That doesn't explain why I need to blog quickly though.  Today is just a hectic Monday, several albums to design and stuff, but it's great to be busy, that's for sure!

I just wanted to give you an example of how adding flash can give your image more umph when used correctly.

Below is an available light image.  80mm, f/2.8, ISO 200, 1/400 sec.  This image never went to the client because to me, it's lacking something.  The background for one is overexposed and the subjects are too dark.  Sure, I could work some photoshop magic, but to me, that's an extra step I shouldn't have to take in the first place.  I strive very hard to get my images right in camera, so that when it's time to edit, all I have to do is 'enhance' and not to 'fix.'  It's been a long process getting to this point, but I think it's helped me to improve in my craft, and I still am striving to learn as much as I can :)


After taking the above image to assess the lighting (and we'll say that it was also for the purposes of this mini tutorial LOL) I knew that available light was not going to cut it.  I immediately set my shutter to sync speed for flash (1/250 on my D700), and went to work on exposing the background correctly.

Here's the next image I took, ISO 200, 112mm, f/5.6, 1/250.   First thing I did was set my shutter to 1/250 like I said above.  Then I adjusted the f-stop to a point where I got my background to be the way I liked (kind of on the darker side).  Then I added the flash on the couple and adjusted that until they were properly lit as well (I told my husband whether to raise or decrease the power).

So, first expose for the background to get it to look the way you want, then add the flash to light up the subject and adjust that until it's how you want as well.  Remember, assuming nothing is really in close proximity to your subject, the flash only affects your subject and the background is affected only by the ambient available light.   This isn't always the case (such as if the background is RIGHT behind the subject, etc...) but in general when doing environmental portraits, this is what I think of in my head when I do these shots.

Here's a pic behind the scenes (well, not in this exact location, but just to give you an idea where my assistant aka my husband stands).  Usually a 45 degree or so from my camera position, but sometimes less if I have to be careful about shadows.


I don't know about you, but to me, the one with flash looks 10xs better, at least in this type of situation!


Okay gotta go, sorry if this is semi repetitive, but I'll do some more intense how-to's in a bit, I promise!

Oooo I just realized I can do an indoor version of this too, that will probably be 'part two'. :)